The Yellow Farmhouse Garden

August 14, 2014

Time to let heirloom beans make seeds

Filed under: Seeds,Vegetables — bob @ 2:42 pm

Earlier in the season I mentioned that we were growing a few heirloom bean varieties.

The results are in. It turns out that the differences between varieties were pretty dramatic. ‘Chabarowsky’ beans out-performed all the rest of the varieties by a wide margin.

The seeds germinated and grew vigorously in the dry sandy soil in that part of the garden.

Chabarowsky has a climbing habit which makes it a pole bean type. I grew ours on a length of farm fencing so they were very easy to pick.

The beans themselves, when I picked them at the optimum time for green beans had no strings in the pods. They were simple to prepare for cooking. The rest of the varieties all needed to be “stringed” first. To be fair though, all of these varieties are grown primarily for dry beans, so picking them for green beans was not the best use for them.

On the other hand Chabarowsky beans have an excellent taste when cooked green.

I’ve picked quite a few green beans from the vines, now it’s time to let them grow and mature into dry beans. It takes about six weeks from the time the beans are in the edible stage until they will be mature enough to harvest for seed or dry beans.

Chabarowsky bean pods can grow to a foot or more.

Chabarowsky bean pods can grow to a foot or more.

Chabarowsky will eventually produce white beans that look kind of like over-sized navy beans. Even though the vines are loaded with pods, there’s no way they will produce enough to make more than one batch of bean soup. Most of the beans will be used for seed. I’ll save some for planting next year and share the rest. I am curious however, how the dry beans taste.

Even though the Chabarowsky variety did well in my garden with its sand and low pH, it may not perform well in someone else’s garden. That’s why there were so many different seeds saved and passed down by generations of gardeners. The best performers in specific locations eventually became heirloom varieties.

Bob

July 8, 2014

Nitrogen deficiency in sweet corn

Filed under: Fertilizers,Vegetables — bob @ 2:21 pm

I just got back from a relaxing week-long vacation at Bear Lake in northern Michigan.

The first thing I did, even before unloading the car, was to take a look at the garden. It’s amazing how much a garden changes in a week at this time of year.

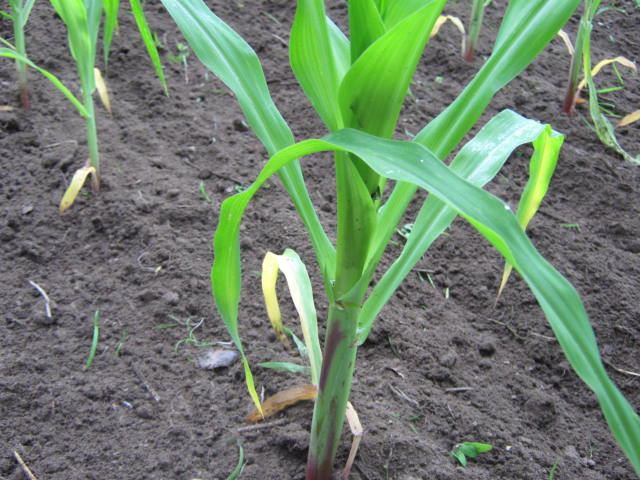
Everything looked great except for my sweet corn; it’s looking a bit peaked. The lower leaves are turning yellow, which is a sure sign of nitrogen deficiency.

If plants can’t get enough nitrogen from the soil, they will rob it from older leaves and use it to grow new leaves — that’s what causes the discoloration.

Plant use nitrogen to make chlorophyll, the green part of a leaf that is responsible for photosynthesis .

Plant use nitrogen to make chlorophyll, the green part of a leaf that is responsible for photosynthesis .

I can trace the problem back to last season. In that spot last year, I mulched the growing vegetables with a generous covering of wheat straw. This spring, instead of raking out the old mulch, I left it in place and tilled it under.

Since then, soil microorganisms have been working overtime trying to decompose all of that straw. They require loads of nitrogen to do the work of decomposition. As a result, there is not much nitrogen left over for the sweet corn to use.

Now I’ll have to add nitrogen fertilizer to make up the difference. I have some urea fertilizer left in a fifty-pound bag that I have been dipping into for several years now, it’s finally almost empty.

Urea is an artificial fertilizer that contains forty six percent nitrogen and nothing else. That makes it a “hot” fertilizer, meaning it is very easy to burn growing plants with it if you’re not careful. I like to mix it with sand to help make it easier to spread evenly.

Other types of fertilizers, such as fish emulsion and blood meal, contain nitrogen in a different form and will provide nitrogen without the danger of plant damage. Because those types of fertilizers contain less nitrogen on a pound for pound basis as urea, you’ll have to apply more to get the same results.

Nitrogen deficiency results in weaker plants and lower yields so it’s a good idea to correct the problem early, while the plants still have time to recover.

Bob

June 19, 2014

Pruning tomato plants

Filed under: Vegetables — bob @ 11:46 am

It’s always best to keep tomato plants off of the ground rather than letting them sprawl all over the place. Leaves and fruit in contact with the soil are more prone to disease problems. Tomatoes laying on the ground are often damaged by insects and slugs.

I usually use tomato cages but, most of the time, the plants grow so much that they topple the cages and end up on the ground anyway.

This year I’m going retro with my tomatoes by using old-fashioned staking and pruning. Pruning was very popular before tomato cages became the most prominent way of growing tomatoes. There are many gardeners who still prefer this method.

The objective to pruning tomatoes is to train the plant to grow a single main stem.  You do that by pinching off any side shoots or “suckers” that develop in the joint of leaf stems. When left to grow, the suckers form side branches making a bushy tomato plant. Pruning eliminates all side branching.

Pinch off side shoots -- or suckers -- under four inches with your fingers. Larger shoots may have to removed with flowers snips or a small pruner.

Pinch off side shoots — or suckers — under four inches with your fingers. Larger shoots may have to removed with flowers snips or a small pruner.

You have to be diligent about your pruning or else the plant will tend revert back to it’s natural bushy growth habit. I think the main reason why pruning fell out of favor was the time involved.

Pruned tomatoes must be staked.  And you need to tie each tomato vine to a stake at least four or five feet high since pruning stimulates so much upward growth. In late summer you can limit the height by pinching out the tops of the plants.

By staking, I’m saving a lot of space too. I’ve got my plants only two feet apart instead of my usual three or four feet apart.

One other side benefit is staked and pruned plants produce tomatoes up to two weeks earlier than non-pruned plants.

Bob


May 14, 2014

Wild asparagus

Filed under: Vegetables — bob @ 7:24 am

This is the time of year when we see cars parked along the roadside and people nearby with their heads down looking for something. What is it they’re looking for? They’re hunting for wild asparagus.

Wild asparagus is the same as the cultivated kind. When growing out on its own without anyone tending it, it’s called “wild”.

The best place to find wild asparagus is near abandoned homes or sites where a house used to stand. That’s because years ago, everyone had a small asparagus patch in their yard. Asparagus plants are perennials and often outlive their original owners.

A wild asparagus patch can also start from seed. Sometimes you can find a secondary patch growing under nearby trees where birds perch and spread asparagus seeds in their droppings.

It’s pretty hard to find asparagus just by searching for the newly formed spears without knowing where to begin looking. Seasoned asparagus hunters look for the distinctive fern-like, fully-grown fronds —  the mature plants that develop from the spears. They make a mental note of the location and come back the following spring to harvest the spears.

Asparagus is hard to find unless you know where look.

Asparagus is hard to find unless you know where look.

If you don’t know what an asparagus frond looks like, find someone who is growing asparagus and take a look at the plant. Once you’ve learned to recognize asparagus fronds, you’ll easily be able to spot them from your car while driving down the road.

Like morel mushroom hunters or smelt dippers, many asparagus hunters won’t share their secret spot with anyone except their closest friends. I’ve even had the weird experience of an asparagus picker get upset with me because I was picking asparagus from “his patch” even though it was on my property.

Keep in mind, when you do find a wild asparagus patch, ask permission from the land owner before you harvest the crop.

Happy hunting!

Bob


April 21, 2014

Peas for a cool spring

Filed under: Seeds,Vegetables — bob @ 10:48 am

Many years, I don’t even bother planting peas.  More often than not,  the spring weather around here is just too warm to grow much of a crop.

Peas need cool growing temperatures to grow otherwise, if the temperature gets too high, they just quit growing and never produce. That goes for all types of peas: shelling peas, snow peas and snap peas.

Shell peas are the type of peas we buy in the frozen food department. Those have already been shelled from their pea pods and quick frozen.

Snow peas are the flat-podded peas used in Chinese cooking. Snow peas are harvested while the pods are still quite flat and the peas inside are just beginning to swell.  I like to plant snow peas because they’re essential for stir-frying.

Snap peas have edible pods too but they are not snow peas. They are harvested and eaten much like a green bean, when the peas are larger but still tender. ‘Sugar Snap’ is one of the first ever varieties of snap peas developed.

This spring is shaping up to be a good pea growing year. I plan to get an extra large spot planted just  as soon as the soil temperature warms up to 45 degrees F.


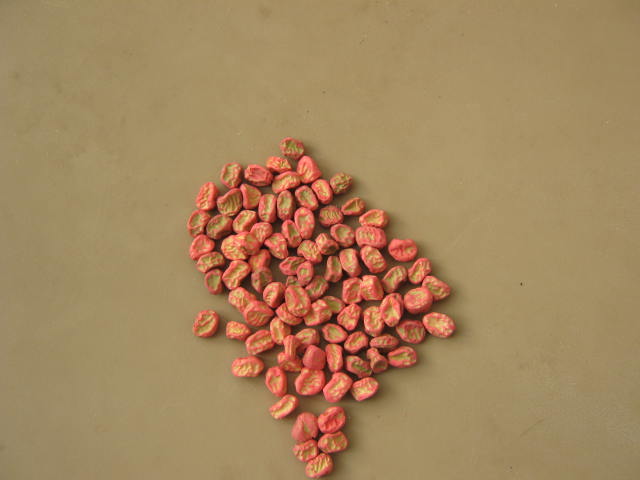
Most pea seed these days are sold as untreated seed. Treated seed is covered with a chemical that helps protect the seed from rotting in cold damp soil. It is identified by it's brightly colored dye.

Most pea seed these days are sold as untreated seed. Treated seed is covered with a chemical that helps protect the seed from rotting in cold damp soil. It is identified by it’s brightly colored dye.

You might want to try planting peas too. You just might end up with enough peas to make a meal or two with some left over for freezing.

By the way, the flowering plant called sweet peas are not edible. The belong to an entirely different genus.

Bob

« Newer PostsOlder Posts »

Powered by WordPress