The Yellow Farmhouse Garden

April 13, 2017

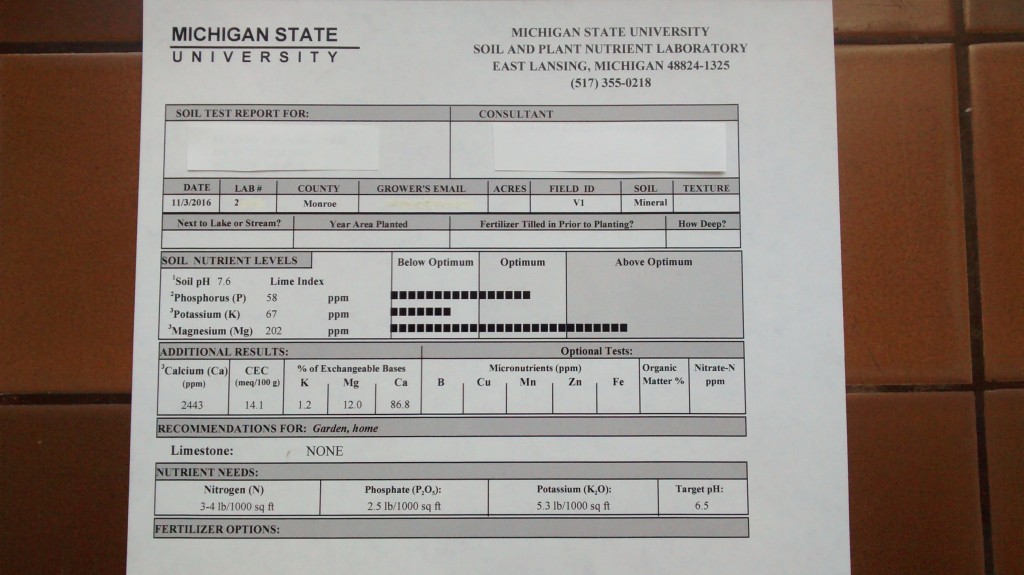
What a soil test result readout looks like

You’ve read it here in this blog, you’ve heard it from your neighbor, even your Aunt Bootsie told you to get a soil test for your garden.  I’ve always recommended using the soil testing lab at Michigan State University, it’s the “gold standard” of soil labs in Michigan. For most gardens a basic test will provide you with all the information you’ll need.

In past blogs I’ve described how to properly take a soil sample for testing and what to do with it once you’ve collected it, so we won’t discuss that today. Instead we’ll look at actual soil test results.

Once you’ve rounded up a bag of dirt, sent it to the lab along with your payment, the MSU soil lab will test your sample, processes the results and send you the test results either by email or by mail. That usually happens within ten days.

Let’s take a peek at an actual soil test readout I received last fall.

A basic soil test result readout.

A basic soil test result readout.

The first test result is the soil pH. pH describes how acid or how alkaline your soil is with “7″ being neural. In this case the sample result is 7.6 which is somewhat alkaline. So right away we know we won’t have to add any lime to raise the soil pH since most garden plants grow best in a slightly acidic soil.

Next is the result for phosphorus, the “P” in NPK. The result came back at 58 ppm (parts per million) which, according to the graph is well in the optimum range.

Following P we see that is the potassium (K) is 67 ppm which we see is below optimum. Magnesium (Mg) at 202 ppm is above the optimum range.

Calcium(Ca), shown in the additional results section is 2443 ppm which helps to explain the relatively high soil pH reading since calcium will raise soil pH.

The next result is CEC (cation exchange capacity) this tells us how well the soil is able to retain soil nutrients. A reading of 14.1 tells us we can add fertilizer to this garden without having it leach out of the soil. Usually, soil types with a higher percentage of clay in their make-up have a higher CEC and therefore are inherently more fertile because of all the retained nutrients. Very sandy soils have low CEC values. It is very difficult to change the CEC of a soil. On the other hand, we can easily raise the NPK values by simply adding fertilizer.

Those cations (positive-charged ions) that are being described in the CEC reading are mostly K, Mg and Ca. There is a section in the readout providing the percentage of each of those. Phosphorus is not listed there because it exists in the soil as negatively charged anion (PO4 3-).

Nitrogen (N) is not tested for at MSU because soil nitrogen levels change with the temperature and other variables so you would never get an accurate reading.

We don’t have room here to discuss the soil science behind the results. Fortunately, the soil lab boils it all down to some simple recommendations at the bottom of the readout.

The nutrient needs are listed as actual pounds of each element per 1000 square feet. Since fertilizer is not sold as pure nitrogen, phosphorus or potassium, the precise amount of any type of fertilizer must be mathematically calculated. Back in the olden days when I was an MSU Extension Agent and the results were printed with a dot-matrix printer, I made those calculations by hand on hundreds of test results. Nowadays MSU has an online calculator that you can use to figure out how many pounds of fertilizer you would need to apply.

With the planting season rapidly approaching,I suggest you get your soil sample to the lab ASAP. Much like your income tax return; the sooner you send it in the sooner you’ll see your results.

Bob


November 11, 2016

Rye makes a fine cover crop

Filed under: Cover crops,Soil,Weeds — bob @ 1:58 pm

I finally decided to close down the garden a few days ago. It is the third week of October after all. I’m hoping that the weather will stay mild so my cover crop of rye will germinate and make some good growth before winter sets in.

Rye is one of the best winter cover crops for our area. You can let your garden grow for a full season and still have time to plant your cover crop after the garden has stopped producing. Fall-planted rye will make good growth and do very nicely over winter, especially if we have a covering of snow to protect the plants from harsh winter winds.

On sloping sites, cover crops such as rye, stabilize the soil keeping it from washing downhill. On flat sites, cover crops keep wind from blowing away your hard-earned topsoil.

It’s true, you can just leave those small fall growing weeds in your garden and they will do much to control erosion but rye has another huge advantage.  A cover crop of rye will reduce the bio-mass of weeds by 80-90% vs an area with no cover crop. Because it grows so fast in the fall, rye will smother weeds that are trying to grow. Not only that, its roots produce a compound that keeps weed seeds from sprouting. Compare that to a garden that is covered with small over-wintering weeds waiting to grow again in the spring and you’ll see what an advantage that is.

Rye is not the same as ryegrass.
Rye is not the same as rye grass.

You can’t actually see it with your eyes but soil nutrients can get washed down into the soil profile by autumn rains and melting snow far enough where it is no longer available to your garden plants. As it grows, rye will capture soil nutrients retaining them in the form of roots, leaves and stems.

The most difficult part about planting rye is finding small quantities of seed. Here I have a one bushel bag of seeds weighing 56 pounds.

Another fascinating thing about rye is that it has the ability, unlike many other plants,  to extract usable minerals directly from raw soil particles. It then uses the minerals for its growth and development — essentially making its own fertilizer. In the spring, the rye plants are tilled into the soil. As they decompose, these new minerals are released into the soil for garden plants to use.

I prepare my garden for its cover crop by first removing much of the existing plant material, mostly the stuff that tends to get caught up in the tiller tines. Then I’ll run the tiller over the garden to mix in the plant debris. At that point the area is ready for seeding. I evenly broadcast about three pounds of rye seed per thousand square feet evenly over the area. Then I make a very shallow pass with the tiller to mix the seed into the top couple of inches and I’m done.

Use a small broadcaster to spread half the seed in one direction then the remaining half cross-ways to get an even stand.

Keep in mind you are not planting a lawn here. Too much seed will give you a dense rye plant population making it very difficult to till under your rye crop in the spring.

Bob


April 28, 2016

Be sure your garden soil is ready to till in the spring

Filed under: Soil — bob @ 9:40 am

We’re fast approaching garden tilling time. It’s not unusual around here to see gardeners preparing their soil by the first week of May. But the calendar is not the best indicator for deciding when to begin working your garden soil.

Tilling a garden at the wrong time can be damaging for certain types of soil. That is why it’s good to know when to till. Tilling too soon in the spring can be disastrous for a garden.

Gardeners make gardens in all types of soil: sand, loam, clay or, more often, a combination of two or more of these types. Short of hauling in new topsoil, there is nothing you can do to change soil type. Adding compost will vastly improve a soil’s ability to sustain plant growth but will not change the soil type.

Soil structure is different than soil type. Soil type refers to the size of the soil particles and the percentage of the different particles. Sandy soils have the largest particles while clay has the smallest, silt falls somewhere in between.

The garden soil in our upper garden is OK to till.

The garden soil in our upper garden is OK to till.

Soil structure refers to the arrangement of the sand, silt and clay particles in the soil. In soils with good structure , the soil particles are clumped together. That gives adequate space between the particles allowing water and air movement into the soil.  That provides the ideal environment for plant growth.

Tilling too soon can destroy soil structure making it difficult for plant roots to grow. In the spring, the limiting factor is soil moisture.

Sandy soils are the most forgiving soil type. In a garden setting, sandy soils can be quite wet and still be tilled without doing much harm to the soil structure. On the other hand, loam or clay type soils are much more susceptible to soil structure damage caused by early tilling.

There’s a simple test you can do right in the garden to help you decide when it’s time to till your individual garden. Scoop up a handful of soil and roll it into a ball. Lightly poke it with your finger. If it falls apart easily, it’s OK to till. If the ball holds together it is too wet to till. Let the garden dry out and try the test again later.

By getting into the garden early you may gain a couple of weeks of growing time but make sure your garden soil is ready to start the same time you are.

Bob


March 31, 2016

Use boiling water to protect newly sprouted seedlings against damping off disease

Filed under: Disease,Seed Starting,Soil — bob @ 10:50 am

Growing your own transplants from seeds is a very satisfying experience and can save you money too. However it is not without it’s problems. Just about every gardener who has started plants from seed has a story to tell of watching a crop of seedlings just starting to make good growth then all of a sudden the plants shrivel at the soil line, fall over and finally die.

That is a symptom of a condition known as “damping off”. It also kills newly sprouting seeds under the soil giving the impression of a low germination percentage. The gardener gets the wrong impression that he’s planted a batch of bad seed when in reality it’s damping off.

Damping off is most commonly caused by a soil based fungus called Phythium, but Rhyzoctonia and other species of fungi can cause similar problems. Whatever the case, it is not curable.

It’s an insidious disorder. The seedlings can look sturdy and strong then suddenly,bam! overnight an entire tray of seedlings will be lost.

Most of the time you can avoid damping off by purchasing a fresh bag of sterilized soil-less seed starting mix. Sometimes however, even a new bag of starting mix can harbor the fungus, although that is pretty rare.

When Pythium shows up, it’s probably the gardener who contaminated the mix by using dirty tools, pots, or even the potting bench. All tools and containers need to be scrubbed clean with a detergent. To be doubly sure, the items can be dipped into a 10 percent solution of household bleach.

Although all plants can be infected, some species of plants are more susceptible to damping off than others. For example petunias are prone to the infection.

A six inch pot is a good size for less that thirty or so seeds.

A six inch pot is a good size for less that thirty or so seeds.

Whenever I start a batch of expensive or hard to find seeds and don’t want to take any chances of losing those precious seedlings, I take the extra step of re-sterilizing the starting mix. Some might say I’m being extra cautious but sometimes seeds are irreplaceable and need all the protection we can give them.

For small amounts of soil, I pour boiling water through a pot of starting mix — then go back and do two additional pours. If you decide to try it yourself, be sure to place the pot in a spot where the water can drain through easily. I like to do this outside on a wire rack rather than in the sink.

This boiling water method has been used by gardeners for a long time and has shown to be pretty effective. Since the entire volume of the soil mix will not reach 212 degrees Fahrenheit — the temperature at which it would be considered sterile — this could be considered more of a pasteurization method rather than actual sterilization technique.

Bob


October 8, 2015

Time to plant cover crops in the garden

Filed under: Grain,Soil — bob @ 7:23 am

It’s not your imagination, the growing season is winding down early this year. The excessive rain and cooler than normal temperatures in our area have combined to make it a challenging season for many garden plants especially the warm weather crops like tomatoes or peppers.

Farmers are noticing it too. Many field crops never fully recovered from poor start of the season and are showing signs of maturing early. As a result there may be a reduction in yields as well.

Certain beds in my garden are already kaput. But there is a silver lining in that. It gives me a chance to plant a green manure crop, which I don’t often get to do.

The terms green manure and cover crop are basically synonymous. Green manure is a crop that will be turned over into the soil while still growing, a cover crop may or may not be turned into the soil right away.

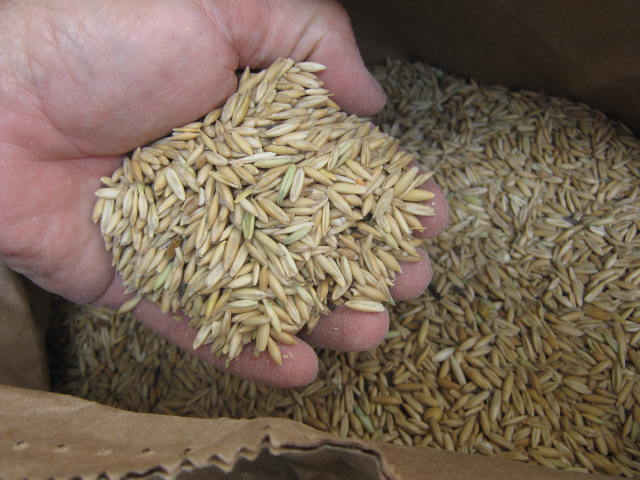
Oats used for feeding livestock are fine for cover crop seed. Note the husks are still on the oats.

Oats used for feeding livestock are fine for cover crop seed. Note the husks are still on the oats.

These types of crops are great for recovering soil nutrients from the soil and holding them until next year’s planting season. Some soil nutrients such as nitrogen are easily washed down into the soil profile by fall rains or melting snow putting them out of reach of most garden plants. Much of that valuable garden nutrients that you worked so hard to build up could be lost.

Multiply the nutrients over hundreds of acres and you can see why farmers use cover crops to save money and protect the environment at the same time. Nutrients that stay in the field will not get washed into steams and rivers where they end up being a source of water pollution.

In other words, green manures effectively “mop up” nutrients and hold them in place until they are needed next year.

In a garden situation, the biomass that a green manure crop adds to the soil may be more valuable than the nutrients they conserve. You really can’t have too much organic material in garden soil.

A cover crop also provides a better habitat for soil microbes to flourish as opposed to bare soil.

Planting cover crops is a fairly advanced technique for home gardeners even though it is very effective for both vegetable and flower gardens.

If this is your first time planting cover crops, consider oats, yes the same plant that is harvested and used for making your breakfast cereal. They make a very effective cover crop.

This time of the years we are looking for a plant that will make quick growth and oats fit the bill. Even though they grow quickly, they should be planted very soon.

The other big advantage that oats have is that they will die over winter leaving a mulch on the soil surface that can be tilled in next spring. That also eliminates the possibility that they may become a weed in your garden. I’ve had winter wheat come up in the spring — seeds from straw mulch — and before I knew it they became a problem. Have you ever tried to pull up a well established clump of wheat? They’re pretty tough plants.

Planting oats is much like planting grass seed except the seed is much larger.

Sow oats at a rate of two or three pounds per 1000 square feet about an inch deep. Farmers use an implement called a seed drill to plant oats. The easiest method for a gardener is to broadcast the seed by hand, then till very shallowly with a tiller. Finish off by lightly pressing the area down so the seeds make good contact with the soil.

Farm supply stores sell oat seed however you may have to go online to buy small quantities.

Bob


« Newer PostsOlder Posts »

Powered by WordPress