The Yellow Farmhouse Garden

October 29, 2010

Forced Bulbs, A Cure For The Inevitable Late Winter Blahs

Filed under: Flowers — bob @ 4:30 pm

Our autumn has been quite pleasant so far but before you know it we’ll be  into the winter season.  Christmas and New Year’s are always festive but by the time February rolls around, most of us begin to tire of  the seemingly endless gray days.

By starting a fun project right now, you can head off some of those late winter doldrums in a small way.  Tulips, hyacinths, daffodils, crocus and others can be coaxed into blooming several weeks before their normal flowering season by a process known as “forcing”.  Forcing done by large commercial growers is a complex affair following certain standard procedures to ensure maximum profitability. Home gardeners can use  similar but much simpler techniques to accomplish the same thing.

The first thing to do is get all of your materials together. You’ll need pots or some kind of container (I like six inch pots), potting mix and of course bulbs. I advise gardeners who have never forced bulbs before to start out using tulips.

Fill your pot with enough soil so that the top of the bulb is nearly level with the top of the pot. Do not compact the soil, leave it loose to encourage quick root formation. Then gently place the tulip bulb onto the soil, again don’t press them down. Finally cover the bulbs with more soil leaving  at least 1/4 inch watering space.  If you look at a tulip bulb you will see that it has a pointed top, a bottom and one side that is flat. Place the flat side facing outward. By orienting the bulbs this way you will get the best arrangement of leaves and flowers as the plants bloom.  Keep the soil moist and do not use any fertilizer.

Your planted bulbs will look something like this. Here I have seven small hyacinths planted into a six inch pot. Usually you can fit five or six tulip bulbs into a pot this size.

Spring flowering bulbs need a cold period of at least 13 weeks in order to bloom properly.  So you must find a cold spot to store your pots during that time. The ideal temperature for this cold period is somewhere around 35 to 48 degrees F.  Older homes may have an unheated root-cellar, sometimes known as a Michigan Basement, that will provide the needed conditions. Otherwise, a spot in the garage might fit the bill. I have seen gardeners keep their forcing pots in the window-wells next to the outside walls of their house.

If you decide to store your pots outside, you may want to cover them with screen in order to keep out mice and voles that will feed on the bulbs. Keep the soil moist during this period so that you maximize root growth which will in turn maximize blooming.

After the 13 week cold period is over, you can begin bring the pots into the house. Don’t put them in direct sunlight. As they warm up, they will start to grow leaves and begin to flower.

You can utilize the same techniques that were employed to create this indoor winter display at the Matthaei Botantical Gardens.

There is nothing like your own home-grown forced tulips to brighten up those gray days in February and they make great gifts too.

Bob

September 28, 2010

You Can Divide Daylilies Now

Filed under: Flowers — bob @ 11:23 am

Daylilies are one of the most versatile flowering plants available to gardeners. You can depend on them to produce an abundance of showy flowers and the foliage makes a good ground cover. They are not attacked by insects and are susceptible to only a couple of mild disease organisms that don’t seem to hurt the plant very much at all. There are varieties available that will flower at different times during the growing season so that you can have Daylilies flowering most of the  summer. In addition to all of that, they are perennials meaning you don’t have to plant them over again each spring. In general, Daylilies don’t require as much maintenance as many other flowers.

If you noticed this year that your Daylilies didn’t  produce as many blooms as in the past, it is possible that they are starting to become over-crowded. After four or five years of growing in the same spot Daylilies tend to form a heavy mat of roots in the middle and the plant loses its vitality. To prevent this problem, divide your Daylilies frequently. Late summer and early fall is the ideal time of the year to do this.

These Daylilies are still doing fine and will not need to be divided for a couple of years.

Dividing Daylilies is very easy, all you need really need to do is dig the plants up and split them apart. With Daylilies it is easy to tell where the division should be made because they tend to form clumps of roots with a fan of leaves attached. Break these clumps apart and re-plant them into their bed or into a new spot. Place the clumps at the same depth as they were originally growing.

A clump of Daylilies separated from the main plant.

Many years ago I was asked to divide a relatively large bed of Daylilies. If I remember right my helper and I ended up transplanting somewhere around 2000 divisions.  We ended up constructing three more beds to hold all of them.  It did make a striking display.

If you have had no flowers at all from your Daylilies in the past, it is most likely there is a problem with the site. They do best in partial shade but will grow fine in a sunny spot if the soil is kept moist and has adequate fertility. Keep in mind however that they will not flower if they are planted in too shady of a spot.

Don’t be too concerned if you are unable to work on your Daylilies this fall, they can also be divided early next spring.

Bob

July 8, 2010

Transplant Poppies Now

Filed under: Flowers,Uncategorized — bob @ 9:27 am

Oriental Poppies, once established reliably bloom year after year, sometimes for decades. They don’t like to be disturbed or moved unlike some other perennials that need to be divided every couple of years or so. Those other perennials can be handled more easily for moving.

There are times when plants need to be relocated for one reason or another, maybe you’re moving to a new home and want to bring your plants with you. If you have ever tried to move poppies in the conventional manner, that is in the spring or fall, you probably have been disappointed in the results.

The secrete to moving Oriental Poppies is to dig them after blooming rather than in the fall or spring as you would most other perennials. Once Poppies have finished blooming they enter into their dormant period which starts at this time of the summer and usually lasts until the middle of August.

Carefully dig the roots and divide them if needed and place them into their new spot about 18 inches apart with the buds about two inches below the soil. Poppies need plenty of sunlight to thrive so be sure their new location gets full sun. Other that that, they are quite happy under ordinary garden conditions.

You have plenty of time to move your Poppies so you don’t have to be in a big hurry to do so. Keep in mind that it may take a year or two before the plants bloom again after moving.

Bob

February 8, 2010

Starting Canna Seeds

Filed under: Flowers,Seed Starting — bob @ 1:32 pm

More is involved in starting seeds than popping them into  potting mix and letting them go.  Some species of plants need to have  special requirements met before their seeds can germinate.

Take for example Canna seeds. Yes, I know that Cannas are normally planted as  bulbs (tubers) in the early summer. However some varieties of Canna are available in seed form. Thomson and Morgan offer their own hybrid variety as seeds.

Anyway, Canna seeds have an extremely hard seed coat that  makes it very difficult for the seed to absorb the moisture needed for sprouting in a timely manner.  Canna seeds are also known as “Indian Shot” because they resemble the BB’s used in shotgun shells.  As a matter of fact, because they are so hard and dense,  at one time they actually were used in shotguns when lead was in short supply.

In order to deal with these difficult seeds,  horticulturists have learned that if you “nick” or sand down a small part of the seed coat, water will penetrate the seed and stimulate germination. This “nicking” process is known as “scarification”.

I scarify seeds by rubbing them on sandpaper until a small spot on the seed coat is worn away and you can see the lighter color of the seed underneath.  Don’t get carried away though, if you sand too deep, you may damage the living embryo inside.

I haven’t found a  really good way to hold the seeds other than with my fingers.  Don’t be surprised if some of your fingernail is worn down in the process.

Using sandpaper to scarify seeds.

Once your seeds have all been nicked soak them  in warm water for about 24 hours.  Keep the water warm for the entire soaking period.

These seeds then need to be planted into a potting mix immediately.  Once they have been treated by this process, they will not keep.

I suggest you start your Cannas soon. They will need a pretty good head start if you want them to bloom this coming season.

By the way, after this summer is over you can dig the tubers from these plants and save them for planting next year just like any other Canna.

Bob

May 16, 2009

Longer Lasting Lilac Blossoms

It seems that the Lilacs are producing many more blooms than normal this year. Apparently the long, cold winter didn’t bother them at all.

This means there are so many more blossoms to cut for inside the house. Inside you can enjoy a close-up look at the flowers and smell their wonderful scent!

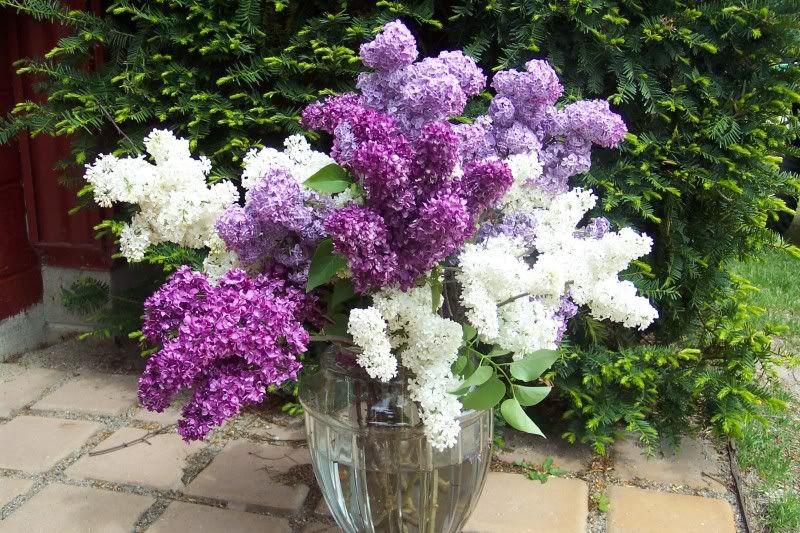
We have three varieties of Lilacs on the property to choose from; white, dark purple and traditional Lilac color. Each one has a slightly different smell. Placing all three together in a vase like this gives you a really complex aroma to enjoy.

Now, Lilacs differ from many other cut flowers in that they  flower on woody branches. This changes how they are handled after cutting.

The more water a flower stem takes in, the fresher and longer lasting it stays. To accomplish this, gardeners have discovered a little trick for cut Lilacs.

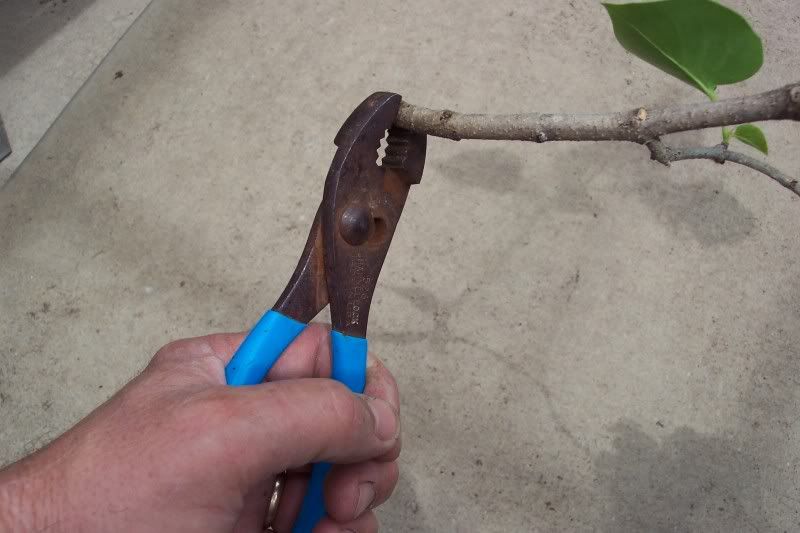
Start by snipping the stem to its final length, one that fits the size of vase. Then take a pair of pliers and crush the cut end of the stem and place the stem immediately into the water. This helps water to move up into the stem where it is most needed.

Cut Lilacs are not the longest lasting cut flower by any means, but by using this simple trick, you can enjoy them for a bit longer.

Bob

« Newer PostsOlder Posts »

Powered by WordPress