The Yellow Farmhouse Garden

May 3, 2014

Planting horseradish

Filed under: Herbs,Planting — bob @ 9:12 am

Horseradish is one of my favorite condiments.

These hot and spicy roots are in an entirely different category compared to hot pepper sauce. I know people who have no problem with the hottest pepper sauce but can’t seem to handle the pungency of fresh horseradish. Maybe it’s because the active ingredient in hot peppers is capsicum, while in horseradish it is mustard oil.

As it turns out, horseradish is a pretty simple herb to grow and is not picky about soil. Of course, like most other plants, the better the garden soil, the larger the yield. Once you get it going, it pretty much takes care of itself.

Right now, is the time to get your horseradish started.

Even though seed is sometimes available, nearly all horseradish is planted by root cuttings. Plant the root cuttings at an angle in a shallow trench, about an inch deep or so, and cover them with soil. Keep them watered during any dry spells.
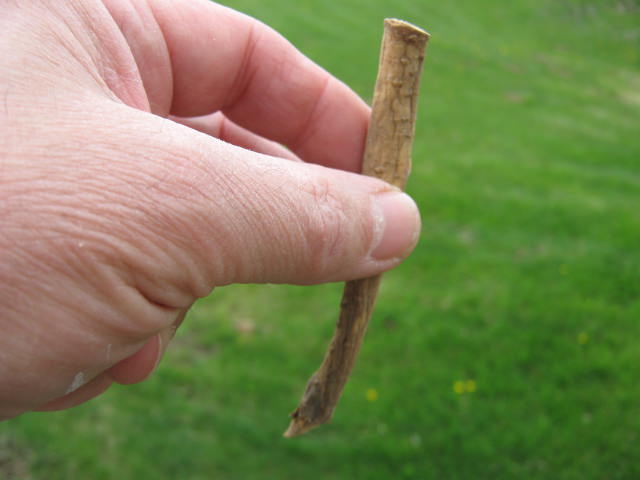
Horseradish root cuttings must be planted right side up. It is standard practice to  make a straight cut ant the top of the root and a slanted cut at the bottom.

Horseradish root cuttings must be planted right side up. It is standard practice for farmers to make a straight cut at the top of the root and a slanted cut at the bottom when they collect root cuttings.

Although I’ve heard of many instances of horseradish getting out control and taking over an area, I’ve never had that problem. The plants can easily reach a height of two feet or more. Two or three plants are enough for most households.

Horseradish roots are harvest during the fall after the first hard freeze.  I prepare horseradish the same way most folks do by grating the roots and mixing it with vinegar.

Bob


April 23, 2014

Cycle of life in the chicken flock

Filed under: Chickens — bob @ 9:48 am

The big news around here is the arrival of our new day-old chicks. I have fifty baby chicks to keep warm and look after, much like a mother hen except I use a heat lamp instead of cuddling up with them.

They were shipped from the hatchery by the United States Postal Service to our local Post Office. The Post Master called me to let me know they were ready for me to pick up. This is a unique service that the Post Office provides. UPS, FedEx and other shipping companies don’t ship chicks. It’s one more reason, in my opinion, to support our Postal Service and not let it be disassembled by outside competitors.


Chicks eat, drink, run and scratch without needing to be taught by a mother hen.

Even at 24 hours old, chicks eat, drink, run and scratch without needing to be taught by a mother hen.

This latest group of new arrivals will be replacing our flock of old hens. The old gals are not laying enough eggs to pay for the feed they eat, even when they are able to forage out in the yard. So, it’s time for them to move on to the next stage of chicken farming — meat.

Old hens don’t make very good fried or roasted chicken, they are just too tough and scrawny. They do however, make the most delicious chicken broth you have ever tasted.

My old joke is: “I have discovered a fast and easier way to make homemade chicken soup. Instead of butchering one chicken at a time when you start your soup, butcher several at a time and put them in the freezer. Then, take one out of the freezer the next time you make soup.”

I tell that joke every time I pull a hen out of the freezer and it always gets the same response from whoever hears it — silence followed by a quizzical look.

I’ll keep the  old hens around until the newcomers begin laying, about 18 weeks from now.

Bob

April 21, 2014

Peas for a cool spring

Filed under: Seeds,Vegetables — bob @ 10:48 am

Many years, I don’t even bother planting peas.  More often than not,  the spring weather around here is just too warm to grow much of a crop.

Peas need cool growing temperatures to grow otherwise, if the temperature gets too high, they just quit growing and never produce. That goes for all types of peas: shelling peas, snow peas and snap peas.

Shell peas are the type of peas we buy in the frozen food department. Those have already been shelled from their pea pods and quick frozen.

Snow peas are the flat-podded peas used in Chinese cooking. Snow peas are harvested while the pods are still quite flat and the peas inside are just beginning to swell.  I like to plant snow peas because they’re essential for stir-frying.

Snap peas have edible pods too but they are not snow peas. They are harvested and eaten much like a green bean, when the peas are larger but still tender. ‘Sugar Snap’ is one of the first ever varieties of snap peas developed.

This spring is shaping up to be a good pea growing year. I plan to get an extra large spot planted just  as soon as the soil temperature warms up to 45 degrees F.


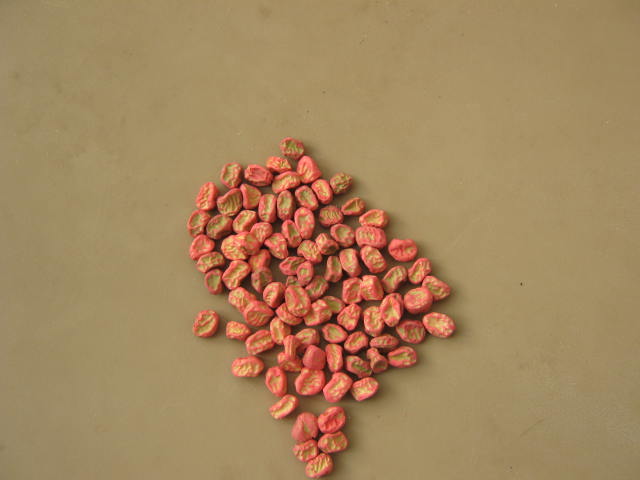
Most pea seed these days are sold as untreated seed. Treated seed is covered with a chemical that helps protect the seed from rotting in cold damp soil. It is identified by it's brightly colored dye.

Most pea seed these days are sold as untreated seed. Treated seed is covered with a chemical that helps protect the seed from rotting in cold damp soil. It is identified by it’s brightly colored dye.

You might want to try planting peas too. You just might end up with enough peas to make a meal or two with some left over for freezing.

By the way, the flowering plant called sweet peas are not edible. The belong to an entirely different genus.

Bob

April 11, 2014

Use a heat mat for quick seed germination

Filed under: Equipment,Greenhouse,Seeds — bob @ 10:11 am

For many years I started seeds without using a seedling heat mat.There never seemed to be any problems doing it that way as long as I was able to find a warm spot for my seed trays. Those were the days when the tops of refrigerators radiated heat and were nice and warm. That was the best place to germinate small amounts of seeds because the constant heat warmed up the seed starting containers to the ideal temperature. Small heat mats for home use were not readily available back then.

It wasn’t until I worked in a large private greenhouse that I really found out the advantages to using bottom heat. I needed to grow thousands of flower and vegetable plants from seed. Time was, and still is, a valuable commodity, I couldn’t afford to wait for seeds to sprout.

Seeds I grew on heat mats seemed to jump up through the soil surface compared to their unheated brethren — germination percentage went up too. After the first transplant growing season, I invested in a few large commercial heat mats.

These days, nearly all garden centers sell small heat mats. They are usually preset at a specific temperature and are not adjustable, unlike the commercial mats.

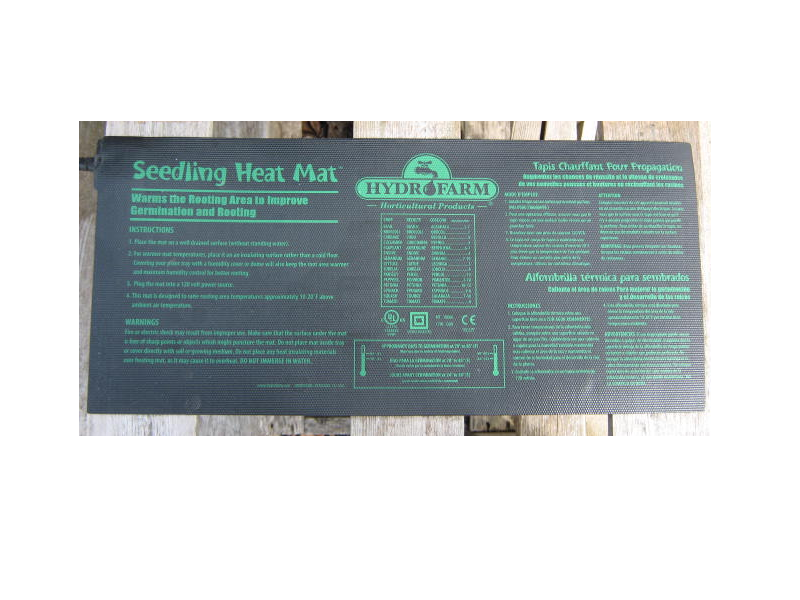
Heat mats will last for years  if you use them properly and store them carefully.

Heat mats will last for years if you use them properly and store them carefully.

The small mats work just fine for small amounts of seeds. By small amounts, I mean you can still germinate enough seeds to grow hundreds of plants. That’s more than enough for an average home garden.

If you are even a little bit serious about growing plants from seed, a seedling heat mat is an essential investment, especially now that refrigerators aren’t warm anymore.

Bob

April 4, 2014

Supplemental light for growing seedlings

Filed under: Greenhouse,Indoor Gardening,Seed Starting — bob @ 9:35 am

Plants need light for photosynthesis and without light they can’t grow. But not all light is equal.

If you remember from your middle school science class, sunlight contains many colors or wave lengths of light. Plants mainly use the blue and red part of the light spectrum and not much else.

Seedlings need good quality light to thrive. The ideal place to grow seedlings of course,  is in a greenhouse or sun-room where there is plenty of natural sunlight. However, not everyone has access to a space like a greenhouse. A south window can help, but even in that case, supplemental lighting may be needed.

An adequate substitute for natural sunlight is light from fluorescent bulbs. Special “grow lights” are available but are quite a bit more expensive than standard fluorescent tubes and they don’t last as long. Research has shown that plants do as well or even better under “cool white” bulbs. Cool white bulbs provide plenty of blue light.

You don't have to spend a lot of money for supplemental lighting. I bought this light fixture for one dollar at a garage sale. I had to buy a new bulb separately.

You don’t have to spend a lot of money for supplemental lighting. I bought this light fixture for one dollar at a garage sale. I had to buy a new bulb separately.

Despite all of the newest research, some gardeners still feel that seedlings grow better if the light is “blended”. So, they’ll add a “soft white” bulb to a florescent fixture to provide some red light for their seedlings. The plants certainly look more natural under mixed lights. Shining light from an incandescent bulb onto the seedlings will also add some red light.

Most vegetable and flower garden seedlings need bright light, at least 500 to 1,000 foot candles. Placing the light fixture within six inches or so will provide them with that amount of light. Still, that is not a bright as a sunny day where there can be 10,000 foot candles shining on a plant.

Just as people need sleep , plants require some darkness every day. So, dig out your Christmas light timer and set it so the lights go out at night  for six to eight hours, that is sufficient for most plants.

If you are really serious about growing a large number of plants under artificial light, special high output light fixtures are available starting at around $300 each.

Bob


« Newer PostsOlder Posts »

Powered by WordPress