The Yellow Farmhouse Garden

November 19, 2013

Repurposing a shade structure into a garden hoop house

Filed under: Greenhouse — bob @ 2:29 pm

The latest addition to my fall garden is a homemade hoop house, which is just another name for an unheated, temporary greenhouse.

I’ve had small hoop tunnels in the past, just big enough for plants but that’s all. This one is big enough to walk into.

Using this structure will allow me to grow cold weather crops such as spinach, kale, and lettuce well into the winter. I also plan to use it to get an early start in the spring.

I made mine from parts to an old shade canopy that I haven’t used for a few years. We used it during the summer months to keep the sun off the picnic tables when we had outdoor get togethers.

Actually, I used only half of the pieces. Using all of the parts would have given me more square footage than I need. I just wanted a modest space to grow lettuce this fall and into the winter.

Looking at the pile of structural parts a had, it occurred to me that I could re-configure them into the size of hoop house I was looking for.

I did have to buy some materials for the project: plastic greenhouse covering, splicing tape, and pipe hardware. Since I didn’t want to cut any part of my shade canopy  – in case I ever wanted to use it for that purpose again — I also bought one length of metal electrical conduit and four connectors to use as post extensions. Since the electrical parts were the same diameter as the parts I already had, it made it easy to splice the two together.

I also added  some thin wood parts to make a door and give a place for me to attach the plastic sheeting. I used 4×4′s for the foundation.

I ended up with a greenhouse measuring 10 ft by 10 ft, that’s 100 square feet of growing space.  Next year, if I feel the need to, I can expand it up to its original size of 10 by 20 feet.
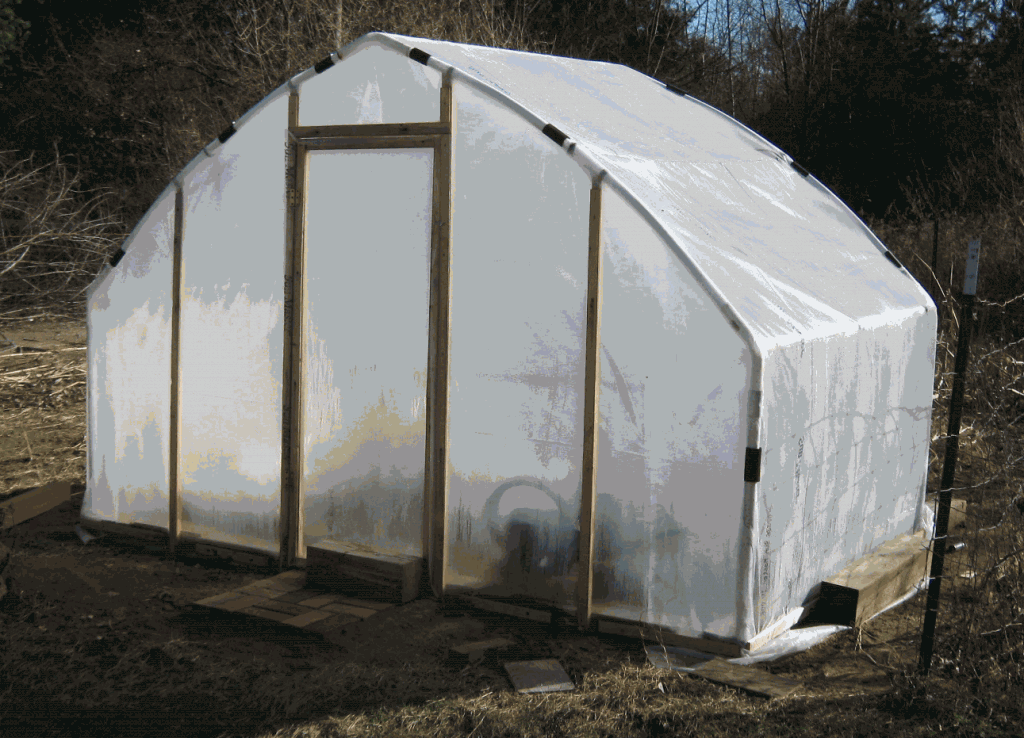
Except for the plastic covering and some hardware, this greenhouse is entirely made of re-purposed material.

If you’ve ever considered urban agriculture, this may be an inexpensive way to get started on a small scale. And if you don’t have a shade canopy?  Well, I’ve seen used shade canopies for sale at yard sales, some of them without their shade cloth or with parts missing. That’s OK though since you’re going to re- design the structure anyway.

So far, my hoop house is standing up against the wind and winter storms we’ve had. I optimistic that it will still be standing when spring arrives.

Bob
Using wild crab apples

Filed under: Fruit — bob @ 10:37 am

I have a young crab apple tree in our wildlife area that I’ve been watching for the past few years. It came up on its own several years ago and this is the first year it produced fruit.

To my surprise, the little apples on this tree are very tasty — plenty of apple flavor with a hint of almond after-taste. I’ve tasted other crab apples in the past and many of them were either flavorless or downright inedible.

They are about two or three times the size of the typical flowering crab apple fruit you see in people’s front yard but, they’re still too small to do much with. Fortunately the apple core is so small I can eat the whole fruit without really noticing the seeds. However, you can only eat so many crap apples before you lose your taste for them.

Since I have so many of them, I decided to try to make a type of rumtopf , a concoction made with fruit, sugar and rum. With their long stems and deep red color, they look a lot like cherries. So I just washed them, picked off the blossom ends and dropped them into alcohol and sugar. Instead of rum, I used brandy because that’s all I had on hand.

I’m really not sure how my rumtopf will turn out but I know it won’t go to waste even if it’s not perfect.

Meanwhile, there are still loads of crab apples left on the tree. The frosty temperatures have mellowed out their flavor even more and they’re still nice and crisp.

As for the rest of the crab apples, I think my next project is crab apple fruit leather.

Bob

October 24, 2013

Some fall leaves are a health risk

Filed under: Shrubs,Trees,Weather — bob @ 8:01 pm

The fall color season is nearing its peak. It’s a beautiful time of the year to be outside watching the leaves turn a little bit each day.

Collecting those leaves is a lot of fun too whether you use them for decorating or for helping your kids make that time honored school project, a leaf collection.

Many people use leaves they’ve collected from fall color tours or from their own backyard to decorate their homes.

Once you collect leaves and bring them indoors, they’ll easily hold their vibrant colors until Thanksgiving.

Be careful though not to bring a health risk into your home.  Poison ivy could be lurking among your hand-collected decorating materials.

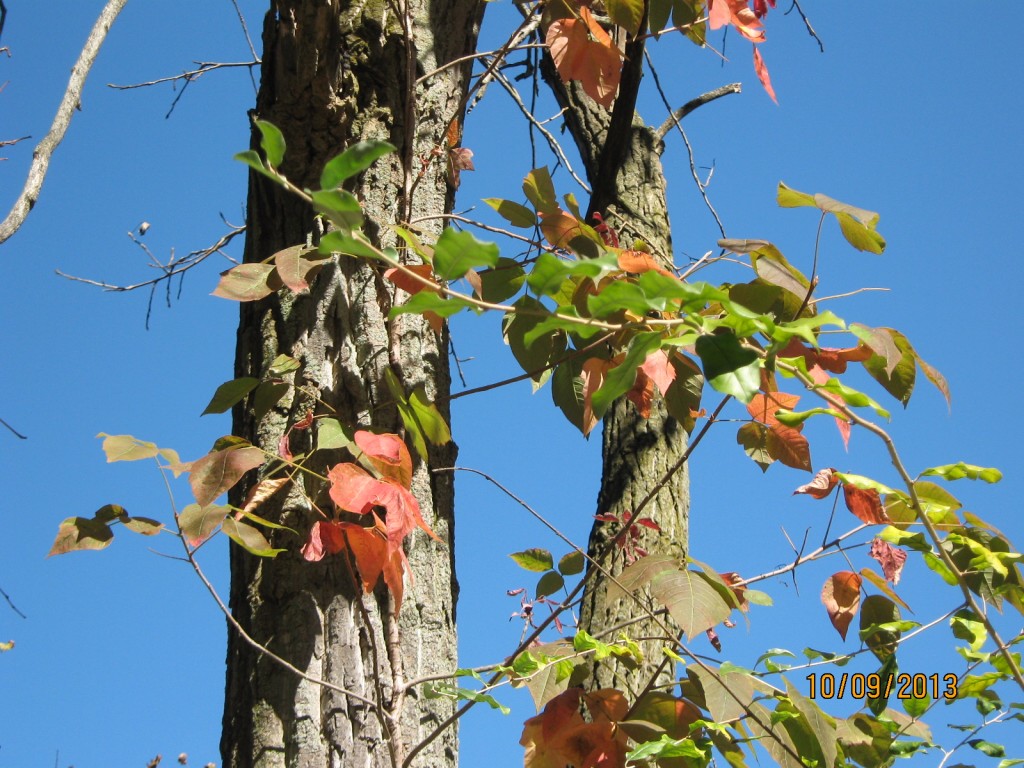
Poison ivy turns a brilliant red color in the fall. This poison ivy vine is just beginning to turn color.

Poison ivy vines are often found growing up tree trunks and even on sides of buildings. In the fall, it produces one of our most brilliantly colored leaves. It’s bright-red autumn leaves are very attractive and would make wonderful indoor decorations except for one thing — they are still poisonous!

Every year I hear of someone “catching poison ivy” in the late fall even though they claim they have never been anywhere near the stuff. Many times their poor dog or cat is blamed for coming into contact with poison ivy and bringing it in on their fur when, in fact, it is the owner’s leaf decorations that are to blame.

To avoid bringing in poison ivy, learn how to identify it. The old saying “leaflets three, let it be” holds true even in the fall. Before picking up an unidentified leaf, take a few seconds to look for nearby vines climbing up trees or walls.

Virginia creeper, on the other hand, looks similar to poison ivy but it has five leaflets instead of three. Virginia creeper is harmless.

Be wary if that bright red leaf is not something you can easily identify before you add it to your table’s centerpiece.

Bob

October 9, 2013

Growing winter wheat in your garden

Filed under: Grain — bob @ 10:31 am

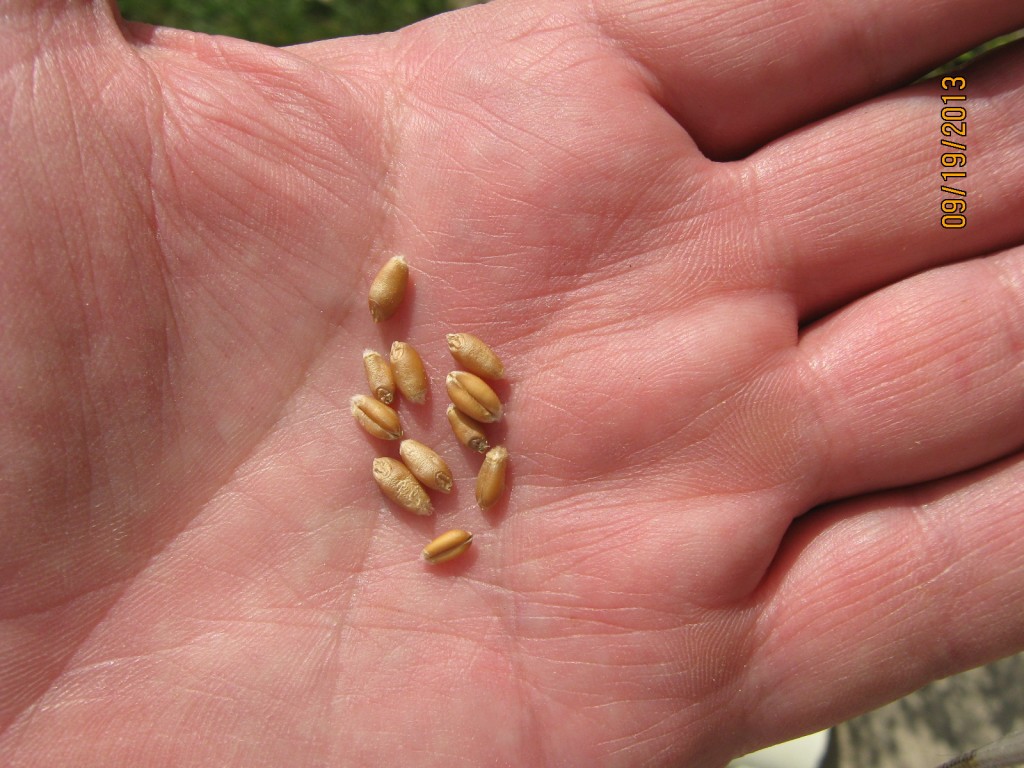
I’ve had people ask me if it is possible to grow their own wheat.

Actually you can grow wheat in small, garden-sized areas using the gardening tools you already have. In Michigan we grow soft winter wheat. So, what does that mean?

Wheat is classified into six general types — or classes: Hard red spring wheat is the type we see most often in the grocery store, it is ground into flour used to make bread; hard red winter wheat is made into all-purpose flour; soft red winter wheat is used for cake and pastry flour; soft white wheat is used pretty much like soft red winter wheat; hard white wheat is also used for some types of breads and is closely related to hard red wheat; durum wheat is used for making pasta.

Even if you don’t want to grow wheat to make into flour, it is still useful to grow in the garden. It makes an excellent over-winter cover crop that helps to scavenge minerals from the soil. Then, when you till in the plants,  those minerals are made available for next year’s crops.

Winter wheat grows thick roots that, along with the tops, add organic material to to garden. It also will keep annual weeds from growing in the spring until you are ready to till an area.

Farmers plant around two million wheat kernels per acre.

Right now is the optimum time to plant winter wheat in our area. Mid to late-September is called “the Hessian Fly free date”.

Hessian Fly is a serious pest in wheat that can drastically reduce wheat yields, although it is not as serious a problem now as it was in years past.

Wheat is fairly simple to grow in a garden. First, till an area as you would for planting vegetables or flowers. Then spread wheat seed evenly over the area by hand or with a seed spreader. For a 10 x 10 foot area use about a quarter pound of seed or a little more to allow for losses from birds or uneven planting.

Lightly roto-till the area so that the seeds are covered by an inch of soil. Finally, press down the seeded area with a lawn roller to make sure the wheat seed has good contact with the soil.

It won’t be long before the seed germinates and you’ll have a nice green stand of growing wheat.

Your amber waves of grain won’t be ready for harvest until the middle of next summer.

Bob

Coyote deer repellent

Filed under: Vegetables — bob @ 10:26 am

In July I planted 30 broccoli plants for a late season harvest and they have been growing like crazy. That is, until one morning last week I went out to check them only to find they were attacked overnight.

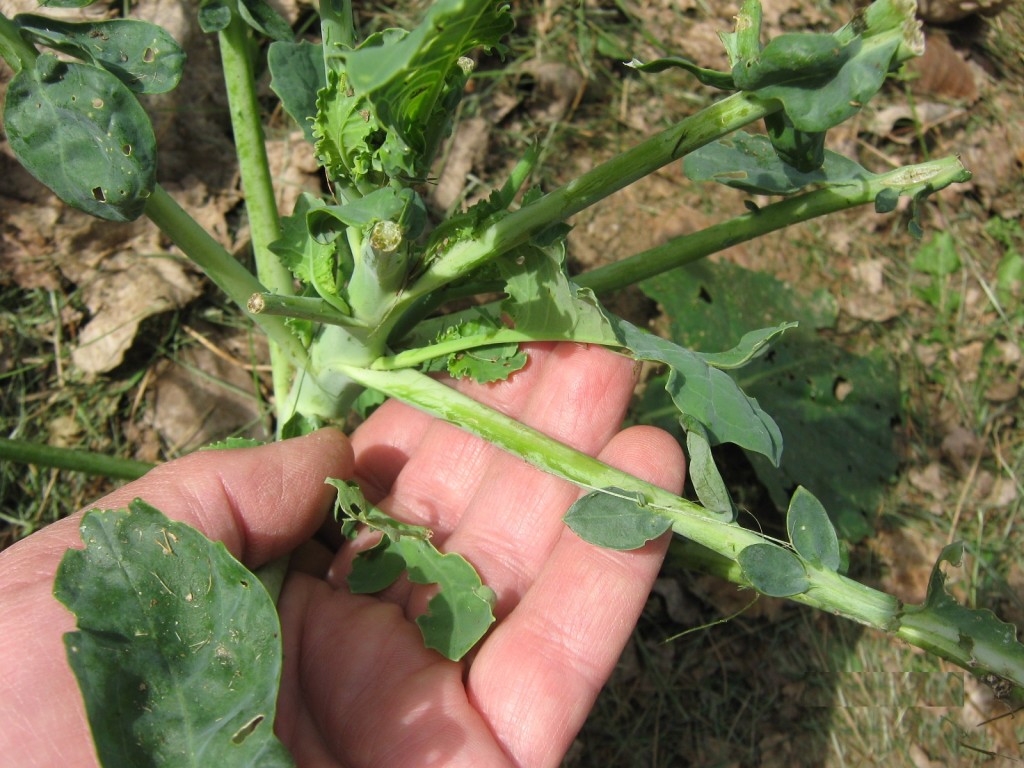
It wasn’t rabbits because their feeding leaves behind clean-cut edges, like someone snipped them with a pruner. These were torn leaves with the damage mostly on the top growth — it was deer nibbling on the broccoli.

This patch is outside the fenced-in area of the main garden. Instead of putting up more fencing, I decided to try something different, coyote urine.

Torn leaves mean deer are in your garden

I have not used a deer repellent for several years because most of the older materials never seemed to work very well.

The package label said that it would take two to three weeks for the urine to work but, in this case, it worked immediately.  I treated that patch and the next morning those plants looked fine, while an area way on the other side of the garden sustained heavy feeding.

I’m now a believer in coyote urine and plan to keep some around to use in the future. By the way, the urine is not in its original liquid state, the manufacturer formulated it into a fine granular material that is easy to apply.

Now, I have to ask, when pronouncing coyote do you say: “ky-yoot” or ky-o-tee?

Bob

« Newer PostsOlder Posts »

Powered by WordPress